Using the New Module Wizard, you can choose SAP R/3 version 3.x or SAP R/3 version 4.x system types as your source. After you select the application version, you need to set the connection information between the Warehouse Builder repository and the SAP application server. You can edit this information using the module property sheet.
| Note: To create SAP Module definitions, you must first obtain the connection information to your SAP Application server from your system administrator. |
When you set the connection information, you can choose the following connection types:
· Remote Function Call (RFC)
This is the default connection type. A remote function call locates a function module running in a system different from that of the caller. The remote function can also be called from within the same system (as a remote call), but usually the caller and the called are located in different systems. This method requires specific IP Address information for the SAP application server.
· SAP Remote Function Call (SAPRFC.INI)
SAP can use its own initialization file to track the IP Address information for you. The SAPRFC.INI enables remote calls between two SAP Systems (R/3 or R/4), or between an SAP System and a non-SAP System. This method is useful when you know the SAP-specific connection information and want to automate the IP connection information.
| Note: To use the SAPRFC.INI connection type, the file SAPRFC.INI must be installed in this directory: X:\ORACLE_HOME\wbapp where |
The New Module Wizard creates the module for you based upon the metadata contained in the SAP application server.
To create an SAP source module:
1. From the Warehouse Builder console navigation tree, expand the Applications node.
2. Right-click the SAP node and select Create SAP R3 Source Module.
Warehouse Builder displays the Welcome page for the New Module Wizard.
3. Click Next.
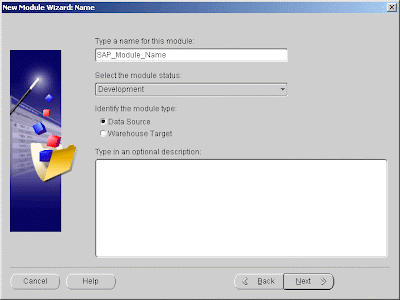
Figure 21-1 New Module Import Wizard Name Page

4. Provide the following information in the Name page:
Name of the module: Type a unique name for the module between 1 and 30 alphanumeric characters. Spaces are not allowed.
Status of the module: Select a status for the module from the drop-down list: Development, Quality Assurance, Production.
Selecting one of these options can help you document the warehouse design version.
Description: Type a description of the module you are creating (Optional).
5. Click Next.
The wizard displays the Data Source Information Page.
6.Select the correct version of your SAP application from the drop-down list: SAP R/3 3.x or SAP R/3 4.x.
Figure 21-2 Error Message for Missing librfc32.dll File

7. Click Next.
The wizard displays the Connection Information page for an RFC Connection
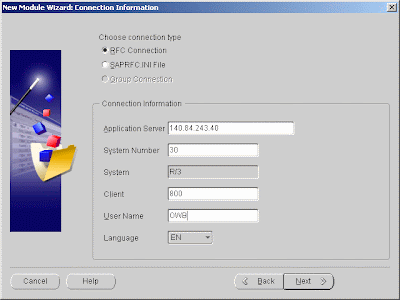
Figure 21-3 New Module Wizard Connection Information Page

Select one of the following connection types:
Remote Function Call (RFC) is the default connection type.
SAP Remote Function Call (SAPRFC.INI).
8. Type the connection information in the appropriate fields. The fields displayed on this page depend on the connection type you choose.
You must obtain the connection information to your SAP Application server from your system administrator before you can complete this step.
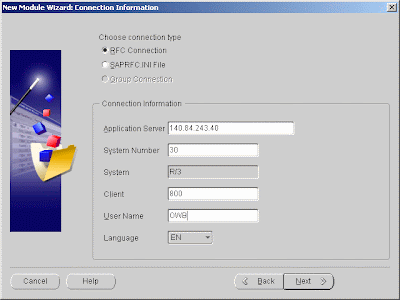
RFC Connection type requires the following connection information,
Application Server: Type the alias name or the IP address of the SAP application server.
System Number: Type the SAP system number for SAP user interface login. This number is required in the SAP application configuration and is supplied by the SAP system administrator.
Client: Type the SAP client number. This number is required in the SAP application configuration and is supplied by the SAP system administrator.
User Name: Type the user name for the SAP user interface. This name is required in the SAP application configuration and is supplied by the SAP system administrator.
Language: EN for English or DE for German. If you select DE, the description text displays in German and all other text displays in English.
Figure 21-4 New Module Wizard Connection Information Page (Default RFC)

SAPRFC.INI File connection type requires the following connection information:
RFC Destination: Type the alias for the SAP connection information.
Client: Type the SAP client number.
User Name: Type the SAP user name for the SAP user interface.
Language: EN for English or DE for German. If you select DE, the description text displays in German and all other text displays in English.
9. Click Next.
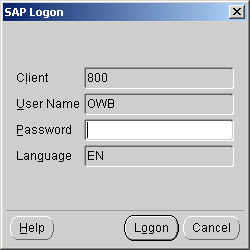
Figure 21-5 SAP Logon Dialog

10.Type the user name and password for SAP user interface and click Logon.
If the SAP application version number you provide on the Data Source Information page does not match the application version for the source system, an error message displays. Click Back to return to the Data Source Information page and correct the application version.
If no error message appears, the wizard logs onto the SAP application and displays the Finish page.
To proceed directly to the Import Metadata Wizard, check the box at the bottom of the page. You can also choose to import metadata at a later time and leave the box unchecked.
11. Click Finish.
No comments:
Post a Comment